Carved Wood Family Tree Sign

My 2 main hobbies are genealogy and crafting. With a 3-year-old and 1-year-old, I haven’t much time for either one (which is why it’s been years since my last blog post). I’m now getting my crafting going again, starting with these carved wood family tree signs!!!

I previously had some printed fan charts displayed on my wall, but I didn’t like that you couldn’t read them from more than a couple feet away. This instead is a simple and attractive way to display our family tree, and because it is made of solid wood it’ll last for years to come.

For my personal tree, I began with my kids’ names in the center position. Then my husband’s name is above them and me below. From there the tree expands up and down for a total of 4 generations.

Since there are living individuals in my tree, I can’t display it online. But here is another one I did beginning with my grandparents.

As you can see, instead of children’s names in the center I used their wedding date. I’ve also thought about doing a short phrase in the middle. The possibilities are endless! These would make great gifts for christmas, weddings, anniversaries, baby showers, etc.

For more info or to place an order, click here!

My 2nd Family History Binder

Last year I made this family history binder as a Christmas gift for my father-in-law, so I decided that this year I would make one for my side of the family. My mom spent last summer photographing church records in a small town in Italy (you can read more about that process in this post), so I wanted to organize her family’s records for her.

I used the same materials as before (see the list here), except I purchased 3 sets of these tabbed dividers instead of 2 for a total of 24 tabs.

My first tab has a numbered 4-generation pedigree chart starting with my mom’s grandmother, Anna Grosso.

I then printed off additional pedigree charts starting with #8-15 so that my mom could reference them while doing research. See this post to see how to print number pedigree charts from familysearch.org or how to create your own.

Each of the numbered tabs corresponds to the number of an individual found on the first 4-generation pedigree chart. 

The first page of each person tab has a printout of their familysearch page so you can easily see their vital facts, spouses, children, parents, and siblings.

I then used Family Tree Maker (FTM) to print the documents I had for that individual. For most, that consisted of their baptism, marriage, and death record. The reason I chose to print them from FTM is so that the source info would print on the same page, reducing the number of pages printed by half.

Since I didn’t have much info about these ancestors, I decided to also include their children. After struggling with whether to group them under the father’s tab or the mother’s tab I instead decided they needed their own section. So after each set of parents, I put a tab for their children and labeled it “children of (#) & (#)”. The first page of that section is a family group sheet. I printed this from familysearch.

I then put a printout of the oldest child’s familysearch page followed by their records, just like I had done for the parents. Then I did the same for each of the children, all within that same tabbed section.

You’ll notice that I didn’t include a photos section this time. I only had a couple photos from this family line, so any photos were instead filed under the individual’s tab.

The other difference is that I didn’t include individual timelines or maps. For most of these individuals I only had their birth, marriage, and death info, which is easily visible on their familysearch page. Also, most never moved from the town so a personalized map printout would have been exactly the same for each individual.


I’d love to hear if any of you decide to put together your own binders and what changes you make to adapt them to your own needs. Either leave me a comment below or come share on my facebook page.

Offline Research

My dad’s ancestors are all from the US, Canada, and the UK so researching their families online has been pretty easy. My mom, however, is from Italy where not as many records have been made available online. Some of the larger Italian cities can be found on Familysearch or Antenati, but my grandparents are both from small towns where nothing has yet been digitized.

My maternal grandmother is from Entracque, a tiny town in the French Alps with a population of about 800 people.  Current government records are kept in a nearby city, but all of the historic genealogical records, some dating back to the 1400s, can only be found in the local church.

My grandpa looking through old church record books

My grandparents have been trying to research their genealogy for decades by visiting the church and requesting to look through their books, but looking up each individual is very time-consuming and too many visits can become an annoyance to the local priest. When my mom decided to go visit last summer, we came up with a plan to digitize the church records so that our family history research could instead be done from home.

Nonno and priest
My grandpa looking through records with the local priest

We researched many different scanners but couldn’t find one that really fit our needs. Flatbed scanners would require turning the book face-down over and over with each page flip, so that wasn’t going to work. I love my Flip-Pal scanner, but it only scans 4″x6″ images so digitally stitching together each page from multiple scans would have been a nightmare. A wand scanner could have worked for some books, but many were wider than the wand and would have required multiple scans for each page.

My dad ended up creating his own “scanner” using a cellphone to capture the images. He purchased a Selfie Stick and attached it to a boom microphone stand so that the phone could be positioned directly above the table and the image could easily be captured by pressing the button of the Selfie Stick. (An even easier alternative that we have since discovered would be to purchase a phone mount that easily attaches to the boom microphone stand and then use a Joby bluetooth remote to control your phone’s camera). Using this process, my mom was able to digitize thousands of pages of birth, marriage, death, and local census records in a matter of days.

record
Digitized birth record

On the next trip, we improved upon this method by creating a stand out of pvc pipes that could be set on the table above the books. We used the same phone mount and the Joby bluetooth remote.

pvc tabletop phone mount
PVC tabletop phone mount

Once these records were digitized, we were then faced with the challenge of searching through the thousands of digital images. They have been organized electronically into folders according to the record book they were captured from, but it is still difficult to find specific records.

To solve this problem, my mom has taken on the daunting task of indexing each record. For each record book she has created an excel file with headings relating to the info found in those records. She then used speech recognition software to enter the data into excel from the records.

spreadsheet
Birth record column headings: Surname, Given name, Gender, Birthday, Father’s given name, Mother’s maiden name, Mother’s given name, Mother’s father, Page number

This is an ongoing project that will require quite a bit of time, but it has already paid off. Once a record book has been transcribed into excel, I can sort the spreadsheet by parent names and easily see family units! I can also perform searches for specific names without needing to examine the images page by page.

spreadsheet families
Family units discovered through sorting spreadsheet

Using this process we have been discovering and adding new individuals every day to our Ancestry and Familysearch trees along with the source info and record images.

Family History Dry Erase Coloring Book

My son isn’t quite old enough to color, but he already won’t sit still during church, so I found this awesome family history coloring book and turned it into a reusable dry erase book for him to use someday. The best part is that it cost less than $3 to make!

I found this Family History Coloring Book at Deseret Book for 85 cents. You can also purchase them from any LDS Distribution Center or online. If you order online you can get them in any of these languages:

  • Chinese
  • English
  • French
  • German
  • Italian
  • Japanese
  • Korean
  • Portuguese
  • Russian
  • Spanish

If you prefer to print the coloring book yourself instead, click here to download it for free!

Once I had my book, I removed the staples and used my paper trimmer to cut right down the center fold line. I discarded the back cover, so there were a total of 11 pages (front cover + 10 coloring pages).

I then placed each page inside a laminating pouch and ran it through my laminator. I use the 5 mil pouches because they are more durable than the 3 mil ones. If you print the pages yourself, you will need to place 2 pages back-to-back inside each laminating pouch.

To finish off the book I just used a 3-hole-punch and 3 keyrings to bind it together. I plan to use dry erase crayons with mine because they are less messy and won’t dry out like markers.

Also for those of you who are LDS, there is a Book of Mormon coloring book available from Deseret Book, the distribution center, or free download.

Military Family History Book

After putting together my Family History Binder, my husband came up with the idea to create a book about the military history of our family. Our plan is to gather military records, pictures, and stories about not only direct ancestors but also uncles and other relatives who served in the military.

I haven’t decided yet if I’ll use a binder and sheet protectors again for this project or if I’ll have it printed by Shutterfly or another company. I plan on doing more research first and then deciding on the format once I see how many and what types of records I gather.

To organize my research, I’ve started a new tree using Family Tree Maker (FTM). The individuals won’t all link together in a tree since some generations don’t have any members of the military, but I can still use the list of individuals to navigate between everyone. At first I had just made a spreadsheet to record my my info but I like that FTM allows you to save all of your images and sources so easily.

So far we’ve already gathered quite a bit of information. My husband posted yesterday in a family Facebook group asking for photos and stories, and responses have already been coming in. I also signed up for a free trial of Fold3 but haven’t had much time to sit down and research yet.

I haven’t done much in-depth military research before so this will definitely be a learning experience. While I’m working on this project, I’m not sure how much time I’ll have for blogging, but I’ll be sure to keep you all updated on my progress and share my research tips along the way.

**Update**

This turned out to be much more difficult than I thought. I ended up only finding the draft records of a few family members and nothing else beyond that. As a result, this project has been put on hold for now.

How do I know if this really is my ancestor?

One of the most difficult parts of genealogy research is determining if the records you come across really are for the particular individual you are researching. Here are a few basic things to check when you find a new record just to make sure you’ve got the right person.

1. Household/Neighbors

It is very common for ages and birth locations to be incorrect on censuses and other records, but if the names of family members are the same and children are in the correct birth order, you can usually assume that you have the right record.

Don’t forget to pay attention to other individuals on the record as well. Neighbors in a census or other passengers on a ship manifest could be family members or close friends. If these same neighbors show up in multiple records, you can usually assume the records are for the same individual.

An example from my own research comes from my search for James Bonnell. All I knew of him previously was that he was the father of David Lusk Bonnell. I found a James P Bonnel in the 1870 census, but from the transcription I had no way of knowing if it was my James or not. Looking at the actual record, however, I saw that my David L Bonnell was living right next door!20170120_114010.pngYou can also see that there is a possible father for James listed in his household, another David L who was 28 years older than James.

2. Location

Just because it says that the person was born in the same state or country as the one you are looking for, that doesn’t necessarily mean you’ve found the correct individual. But if they are living in the same town as a known relative or within a short distance of a location shown in another record, there is a greater likelihood of them being the right person.

I often use Google Maps to find the distance between two locations. For example, my grandmother had been told about a cousin, Vittorio, who had emigrated from Italy to Argentina in the early 1900’s. She knew nothing of this cousin except his name and the address of his nephew who also lived in Argentina. A quick search on Ancestry.com produced a Brazilian immigration record for a man named Vittorio who appeared to be about the right age and was from the same Italian region as my grandma.wp-image-1448058741jpg.jpegUpon further inspection, we found that this record contained a previous address for Vittorio in Argentina. I immediately typed the address into Google Maps along with the nephew’s address and found that they were only about 1.5 miles apart.

argentina-mapThe chance of finding a random stranger with the right name and age living this close to the nephew is very slim so I think it’s safe to say we found our Vittorio.

3. Occupation

The occupation field is often overlooked in records because it is rarely transcribed. If your ancestors had a very common occupation such as farmer or housewife, you can probably continue to ignore it, but if they had a more unusual occupation it can be a great help.

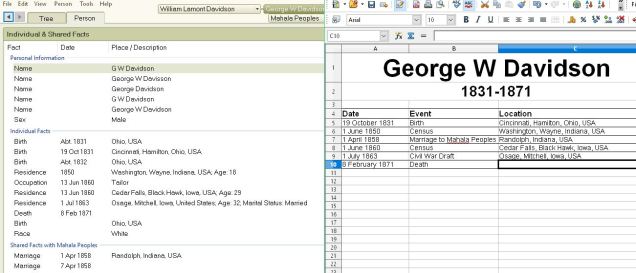
One of my husband’s family lines reached a brickwall with George Davidson. The earliest record I had for him was an 1860 census just shortly after he had married, but with a name that common I wasn’t sure which George was the right one in the 1850 census. While making my family history binder, I printed his 1860 census and noticed his occupation said “tailor”.

I decided to do a quick search on Ancestry.com for a George Davidson in the 1850 census born within 5 years of 1831 in Ohio. I ended up with a list of 7 possible Georges. I went through the images of each of these census records finding farmer after farmer until I finally found one with a George who was a tailor! And he was listed with his parents and siblings!

Many times, sons will also continue in the same occupation as their fathers. One of my husband’s lines has at least 6 generations of plasterers. This has made it easy to follow not only the direct line but also find uncles and cousins who continued this tradition.

You should, of course, consider every part of a record to determine if it really is your ancestor, but hopefully this will be a good starting point for some of you. I’d love to hear if any of you have additional tips to share!

Recording Audio Memories

When our extended family gathers together, everyone always ends up telling old family stories. Many are stories that I’ve already heard hundreds of times, but it is so important to preserve these stories for future generations. Instead of trying to write them myself, I use the Memories App to save an audio recording of each story. It is so easy to use and with it I’ve already been able to record dozens of stories told by my husband’s 93-year-old grandmother.

When you open the Memories App, you will be asked to login to your Familysearch account. If you don’t have a Familysearch account, you will need to create one. This will allow you to save your recordings directly to Familysearch.org.

When you are logged in, tap the microphone on the right to go to the audio section. If you have recorded any audio previously, your recordings will appear on this page.

To record new audio, tap the plus sign in the top right corner. It will show a list of suggested interview questions, but you can also click at the bottom to do your own recording without a question.

 Tap the start button to begin recording. Your recording can be up to 10 minutes long.

screenshot_2017-01-11-10-36-09-1.png

When you are finished, tap stop and then name the file to save it. The file will automatically be uploaded to Familysearch.org.

20170111_104812.png

When your file is uploaded, you have the option of tagging individuals from your family tree. This will link the audio to their Familysearch person profile which will then make it available to anyone viewing the profile.

20170111_120138.png

It’s really that easy! And because these audio memories are stored on Familysearch.org you can guarantee they will be preserved for future generations to access for years to come.

Family History Binder – Part 6 – Documents

This is the sixth and final post of my Family History Binder series. Click here to go back to part one.

In each section of my binder, I placed copies of every document I had about each individual in chronological order. If a document referred to multiple ancestors, I printed a separate copy for each of them. I didn’t use any original documents, but I still wanted to make the copies last as long as possible so I used Avery sheet protectors that are archival quality. Here are some of the types of documents I included:

  • Birth/death/marriage certificates
  • City directories
  • Military draft records
  • Yearbook pages
  • Land records
  • Cemetery records

Most of my sources were obtained on Ancestry.com and Familysearch.org. For any online documents, I printed the image of the document and then also printed the transcription page from the website with the source information. I placed the transcription page behind each document in the same sheet protector.

I wanted to be able to easily find the individual’s name in each document, so I highlighted the corresponding line in the document with a yellow highlighter. This is especially helpful in census records or city directories that contain many names. Before highlighting, I made sure I let the ink dry for at least 30 minutes or else the ink smeared.

I don’t personally have any original documents for this line of the family, but I was able to obtain quite a few copies just from asking relatives. My in-laws have a cardboard box of various family records that I was able to borrow and scan into my computer using an Epson WorkForce Scanner. I love how quickly I was able to scan stacks of documents while still having high resolutions for photos.

Facebook also proved quite helpful in obtaining records and photos. I received a few items by simply asking our Reynolds Family Facebook group. I also came across the Buffum Family Association group (my husband’s great-grandmother was a Buffum) and asked if anyone had information about our particular line. The next day I was sent over a dozen old photos of ancestors, most of which I had never seen pictures of before.

As my research has continued, I have already found several new sources that I will add to my binder. I hope to make similar binders for all of my other family lines and will post updates here on my blog as my work progresses, along with other research tips.

Family History Binder – Part 5 – Timelines and Maps

This is the fifth post in my Family History Binder series. Click here to go back to part 1.

The first page of each ancestor section contains a timeline of the person’s life along with a map showing the locations they lived. I put this sheet inside the  Avery Clear Pocket Label Dividers for each individual.

I use Family Tree Maker (FTM) to keep track of my research. As I input each fact into FTM, they are automatically put in chronological order. I then opened a spreadsheet and with the two programs side-by-side I was able to quickly type the information to create a timeline.

timeline

I also used Family Tree Maker to create the map. After clicking on the “places” tab (#1 in image below), I then changed the dropdown “list by” menu on the left to “person” (#2) and then selected the individual from the list (#3).

places

On the right side, I then checked the boxes (#4) next to the facts that I wanted to include in my map. This will only work if your locations are in the correct format. Then I zoomed (#5) so that the route was centered on the screen. You can then use the snipping tool on your computer to copy the map on the screen, but I found that clicking the “print” button (#6) and then printing as a pdf resulted in a cleaner look.

map-2

One of my individuals moved a few times in Kansas and then moved to Arizona and lived in a few different locations there. To show more detail, I decided to split it into two separate maps and used both.

2-maps

Once I had my maps, all I did was copy and paste them to the bottom of my timeline spreadsheet.

On the back of my timeline, I inserted a family group sheet. This gives me a list of all of the children of the individual. I again used Family Tree Maker to create mine, but here are a couple other options as well:

Blank Family Group Record

Blank Family Group Record with LDS Ordinances

Click here to go on to the next section about how I arranged the documents and sources for each individual.

Family History Binder -Part 4 – Photos

This is the fourth post in my Family History Binder series. Click here to go back to part 1.

The first divider in my family history binder is labeled “maps, photos, etc”. I had originally planned on putting this section last in my binder, but I found that this was the section that people were most interested in looking at and I didn’t want to make them flip past the 200 pages of documents every time.

The maps I included were ones that didn’t necessarily pertain to a specific individual but would still be interesting to have. Here are a couple examples:

colden20188020web

1880 Colden, New York: founded by an ancestor and home to a few generations of his descendents

wincol4c

1878 Winfield, Kansas: home to 3 generations of ancestors

My photo section includes copies of every photo I have of the 15 ancestors in my pedigree chart (see Part 3). I purchased Ultra Pro 5X7 Photo Pages to organize them before discovering that it is actually fairly expensive to have 5x7s printed. I could have used 4×6 but decided instead to have 5x7s printed on glossy cardstock at Staples. I put 2 on each page and then cut them out with my Fiskars Paper Trimmer.

What I love about the Ultra Pro 5X7 Photo Pages is the extra slot next to each photo where you can put a caption.

In my captions, I also included the number of each individual (refer to Part 3 to see my numbering system). My reason for not placing the photos of the individual in their specific section of the binder is that I would need to make multiple copies of many family portraits (the top photo shown here would need to be printed for Carl, Ada, and Aaron’s sections).

I added “etc” to my divider tab so that I can add other types documents in the future if I find that they don’t fit anywhere else, like a family crest or DNA data.

Click here to go to part 5 of the Family History Binder series.